Friday, December 27, 2013

Prosciutto Wrapped Asparagus

I love asparagus and I love prosciutto! Seriously, love love love them both! This recipe, if you can even call it that, is so yummy! I could eat the entire bunch by myself and usually can’t get them to the platter before I have ‘taste tested’ a few….dozen.  This is not an original recipe, but still worth sharing. Many people have a version of this. I actually make these for Thanksgiving, but they are also a really great appetizer that I have done for dinner parties. This would be a really elegant appetizer to add to your New Years Eve party line up.


Prosciutto Wrapped Asparagus


Ingredients:
Asparagus, one bunch
Cream cheese, 4-6 oz softened
Prosciutto, thinly sliced - one slice per two pieces of asparagus


Preheat oven to 400 degrees.
Prep asparagus.


Better Bonus Tip: If you have an option, I think thinner spears work better in this recipe. The thicker stocks can be not as tender. If you can only get thicker, you might just need to bake a bit longer.


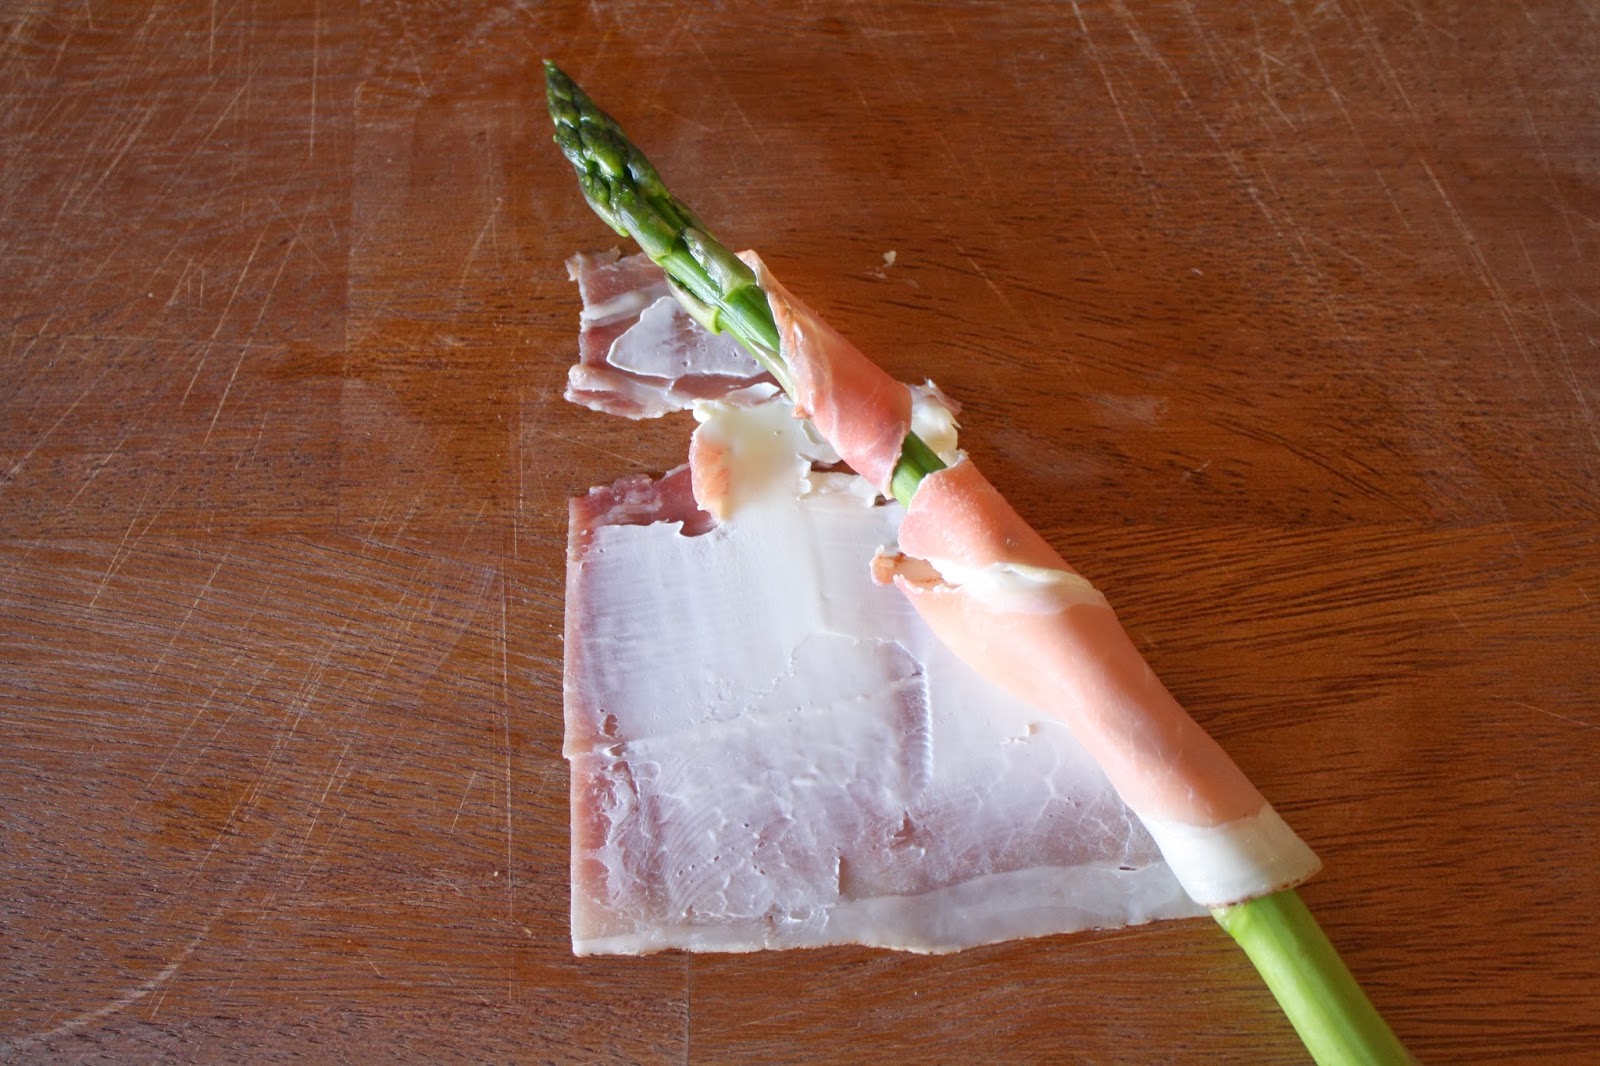
Slice your prosciutto slices into two. I like to do the cut vertically, because I think it is easier to add the cream cheese, but feel free to do two long horizontal slices.


Better Bonus TIp: Prosciutto is a pricer meat. If you would like a more budget friendly version, you could do (nitrate free) deli ham. Just make sure to ask the deli counter to do really thin slices, like they would typically cut prosciutto.


Smear a teaspoon or so of cream cheese onto each slice of meat and then wrap around the asparagus spear.


Bake at 400 degrees for 20 minutes.


I can’t tell you how much I love these!! Salty, creamy, crunchy....what more could you ask for.


Be safe ringing in the new year. If you are looking for some other ideas for your party menu, check out some of my previous posts for appetizer ideas:


Also, don’t forget about my easy tips for throwing a party and some additional simple food ideas.

See you in 2014!


~Ashley


Friday, December 20, 2013

Homemade Vanilla Extract

Looking for a last minute homemade holiday gift? Today, I am sharing how easy it is to make homemade vanilla extract. I have wanted to do this for years, but just never got around to it. Well last month, I was running low on my store bought bottle, so decided to give it a try. Not sure why I waited so long, because it literally takes no energy. All you need is vodka and vanilla beans. The hardest part is probably finding the vanilla beans. I believe you can purchase these online but I got mine at a local spice store.  After I made mine, I actually saw Costco sells them, and they were much cheaper there but of course you have to buy in bulk. I believe the shelf life is pretty long, so you might consider that. Anyway give this a try. It would be great to take as a hostess gift, to give to your child’s teacher or give to a family member this holiday season!


Homemade Vanilla Extract

Ingredients:
Vodka, 1 c
Vanilla beans, 3


Slice your beans open by using a paring knife and making a slit down the length of the bean.


Next, if you are using a jar that is not tall (like I did), you might need to cut the entire bean. I cut mine into thirds. You will want to make sure the beans are completely covered by the vodka.


Add the beans to the glass jar and pour vodka on top.


That’s it! Well kind of, it’s not quite ready to use yet.


Just put the jar in a dark, dry place - like your pantry. Let it rest for 4-8 weeks, shaking once a week. This is what mine looked like after four weeks.


I have also read you can continue to add more vodka as the beans become exposed, getting new beans every three months. I personally don’t think I will be done with one cup of vanilla extract after three months, so don’t see myself needing to add more vodka. I will likely just repeat the entire process when it is close to gone, but a great option to have.


The shelf life is one year.


Better Bonus Tip: If you find the vanilla isn’t as strong of a flavor as you would like, consider adding more beans. The recommended ratio of vodka to vanilla beans varies greatly. I read anywhere from one to eight beans to one cup vodka.


If you are thinking Christmas is next week - there isn’t time. Wrong! Who said the vanilla has to be completely done steeping. Just add a cute little label with instructions to store in a dry, dark place and to shake weekly. Tie it around a nice glass jar with some ribbon or string and voila!


I wish you all a happy holiday season!

~Ashley


Friday, December 13, 2013

Taco Soup

I am not a person that only wants soup in the fall and winter months. While I do love a hot bowl when it is cold out, I enjoy it year round. Even in the summer and it doesn’t have to be cold soups. My husband on the other hand, prefers it during the winter, so I make it a lot! This is one of my go to soups that is so easy. And of course it is Mexican inspired. If you have been following long, you know I love fresh mexican ingredients and love finding different ways to eat them. Also, if you follow the Cooking For A Better Tomorrow Facebook Page, you might remember me posting this last fall. It was a hit, so decided to develop a post for it. Enjoy my take on yummy taco soup!


Taco Soup
Makes 8 cups


Ingredients
Ground beef, 1 pound
Red onion, ½ medium or 1 small (about 1 cup chopped)
Garlic, 2 cloves
Frozen corn, 2 cups
Favorite bean, 2 cups fresh cooked beans or 1 can drained and rinsed
Enchilada sauce, 1 can (mild or hot - your choice)
Diced tomatoes, 1 can (I use fire roasted for extra flavor)
Beef broth, 2 cups
Cumin, 2 T
Chili powder, 2 T


Optional toppings:
Sour cream
Cilantro
Avocado
Shredded cheese
Lime
Tortilla chips (crumbled on top or as scoops)


Chop onion and garlic. Brown meat in a skillet. When meat is starting to brown, but still has some pink, add chopped onion and garlic.


Once meat is completed cooked, add seasonings and stir to coat. Then add corn, beans, tomatoes, sauce and broth.


Better Bonus Tip: If you are using low sodium broth, you might want to add some salt. I don’t need salt like some people do in their dishes (as you might have noticed), but taste and add to your desire.


Bring the soup to a boil and reduce to a simmer. Cook until ready to serve.


Better Bonus Tip: Soups are great to make double batches of and freeze. It takes the same amount of time to make one batch as it does a double.

As the weather gets colder, I hope you will enjoy this soup and stay warm!


~Ashley


Friday, December 6, 2013

Berry Yogurt Fruit Salad

I am back! Our son was born on October 3rd and I enjoyed my little break from blogging and really even cooking much, but am anxious to get back into it. I stocked my freezer before our little boy was born and between working our way through that and food our friends and family brought us, I haven’t had to cook much. I have cooked some, actually in the first couple weeks the most when my husband and parents were around all day helping. I took advantage of their help and cooked some easy meals, so I could save our freezer meals for when it was just us.


Our life is different now, but in oh such a good way. I am loving life! Every day is new and fun. Our little boy is just over two months and smiling, ‘talking’, rolling over and just changing by the day. We are so in love with him and our new life. The holidays are definitely bringing a new joy that we haven’t experienced before. Halloween was fun, even though he isn’t at the trick or treat age. We went to our neighbor's garage party to show off our cute little pumpkin.


Then Thanksgiving arrived before we could blink. Our little guy got to meet new family members and even though it went fast, as it always does between splitting the day with my family and my husband’s, we still had a great time! Lots to be thankful for this year, that is for sure!


I did have a chance to do a couple easy dishes at my mom’s house the morning of Thanksgiving, while the boys played in the other room. I brought my camera along and decided to snap some shots for a blog post. Today, I am sharing my easy fruit and yogurt salad. You can really use any fruit with the yogurt sauce and then top with your favorite roasted nuts. Below is what I did. And the quality of these pictures aren't great - I wasn't on my 'normal set', so the lighting is not great :)!


Berry Yogurt Fruit Salad


Ingredients
Strawberries, 1 lb quartered
Raspberries, 6 oz
Blueberries, 6 oz
Banana, 2
Plain yogurt, ½ c
Honey, 1 T
Vanilla, 1 tsp
Limoncello lemon liqueur, 2 tsp (optional)
Pecans, ½ c


Dry roast the pecans in a skillet over medium heat with no oil. Stir occasionally and make sure not to burn. Chop once done and set aside to cool.


Mix yogurt, honey, vanilla and limoncello. If you don’t have limoncello but still want some citrus flavor, you could use the zest and juice of a lemon, or any citrus fruit.


Better Bonus Tip: Pour hot water into your measuring spoon, before adding honey. This will help it slide out.


Prepare fruit by washing and chopping. Add to a bowl and add yogurt sauce. Stir to coat. Add pecans and serve immediately.  If you aren’t serving immediately, wait to add bananas and pecans until the last minute, but I don’t recommend waiting too long before serving because the berries are soft fruits and will get mushy.


Better Bonus Tip: If you want a harder winter salad, try with apples, pears and grapes.


Better Bonus Tip: Take this fruit salad to a different level of freshness by adding fresh chopped mint. This would be really good in the summer!

I hope to be back to posting every Friday on a regular basis. I am not going to put as much pressure on myself now that my priority is my little guy, so if I skip a week I hope you all will understand. I do have some posts planned for the next few weeks, so stay tuned.


~Ashley