Friday, October 28, 2011

Traditional Basil and Parsley Pesto

Before I start today's blog, I want to apologize to those of you who subscribe to receive email updates. I was told the email didn't get sent out last Friday when I posted. I have no idea what happen, but am hopeful it was just a fluke. My goal is to post something every Friday, so if you don't get an email, feel free to just check out the website. Anyway onto today's entry....

Do you love pesto as much as I do? Pesto is a great way to add some extra flavor to any grain (pasta, rice) or protein (chicken, fish). It is actually quite simple to make as long as you have a blender or food processor. Traditionally, it includes basil, parsley and pine nuts, along with some other staples. A few weeks ago when Zach and I were at the grocery store, I asked him to go get me some pine nuts for a pesto I was going to make. He about had a heart attack when he saw how much the pine nuts cost. Yes, they can be a bit expensive but they are great in a traditional pesto!

Better Bonus Tip: Buy in bulk because it tends to be cheaper and less packaging waste. You can store whatever is left in the freezer to prolong shelf life and prevent them from going rancid.

Traditional Basil and Parsley Pesto

Ingredients:
Basil, handful
Parsley, handful
Lemon Juice, from one fresh lemon
Lemon Zest, from one fresh lemon
Pine Nuts, handful
Grated or shredded Parmesan cheese, handful
Garlic, 2 cloves
Oil

You will notice the ingredients in this pesto are not exact measurements. This is a hard recipe to really know specifically how much of each item to add - I really recommend tasting as you go and just get it to the flavor, texture and consistency you want depending on what you are using it for.

To zest the lemon and maximize the lemon flavor and essential oils, use a microplane or grater to remove the outer layer, making sure not to remove too much, because the white layer is bitter.

Add all ingredients except the oil into a blender or food processor and pulse the machine. Next, gradually add oil as you continue to pulse the machine.  Occasionally stop and manually stir, removing the pesto from the edges of the machine with a rubber spatula. Once you have a nice thick liquid consistency you are done - easy right?
 
Better Bonus Tip: Substitute other herbs or nuts for different pesto variations.

A few simple ideas for serving pesto:

  • Coat a chicken breast in bread crumbs and saute in an oiled pan until crispy. Serve with a drizzle of pesto.
  • Wrap shrimp with bacon and cook until no longer pink and bacon is crispy. Serve with a pesto dipping sauce.
  • Top a slice of toasted baguette with pesto, a tomato slice, a creamy cheese (fresh mozzarella, brie) and a drizzle of balsamic vinegar.
  • Replace a traditional red sauce on pizza with pesto. Top with chicken, shredded cheese and any other toppings that sound good.

Stay tuned, next week I will show you a quick pasta recipe that includes this traditional pesto.
__________________________________________________________________

I have had some questions about garlic after my first post, so I wanted to do a little follow up.

Garlic cloves should be firm and white, without brown or soft spots,. Occasionally, you might find your clove has a green sprout down middle - that means the clove is aging. The taste can be bitter, so you should dispose of that clove and try another. 

A garlic bulb can last a long time, few weeks up to a few months, if stored correctly - in an open, cool, dry space. It is hard to say exactly how long it will last, because you don’t know how long it has been at the store. It is not recommended to store garlic in the refrigerator or freezer.

Hope that helps!

~Ashley

Friday, October 21, 2011

Stuffed Peppers with Sausage and Quinoa

It seems as if more and more people are becoming familiar with quinoa (pronounced keen-wa) and wanting to use it in different recipes for its health benefits. 


When I started researching quinoa, I found conflicting information about it being a grain or a seed. What I took away from my self education is quinoa is known as an ancient grain, but is actually a seed from the Chenopodium or Goosefoot plant and is from the beet/spinach family. When used in cooking it is often treated as a grain, because of its cooking characteristics. There are many different color varieties, with the cream color seen above appearing to be the most popular and accessible at grocery stores. 

Quinoa is easy to make and great for you. It is gluten free, full of iron, and a complete protein (has all 8 essential amino acids). It is light in flavor, so can be a very versatile ingredient. To me, it doesn’t have a ton of flavor on its own (some say a ‘nutty’ flavor), which means it will absorb any flavor you put with it.

When I was first started getting interested in quinoa, I searched for different recipes (which there are a lot of them out there) to get comfortable using it. I found a couple on the Whole Foods website, utilizing it cold in various salads and also warm - my favorite recipe was adding it to meatballs.

After I got comfortable with cooking recipes that incorporated quinoa, I tried my own recipe - hope you enjoy! 

Stuffed Peppers with Sausage and Quinoa
Serves 4


Ingredients:
Bell Pepper, 4
Quinoa, 1/4 cup uncooked
Ground sausage, 1/2 lb
Kidney beans, 1/2 can rinsed and drained  
Chipotle Pepper in Adobo Sauce, one from the can minced finely (adjust to desired level of heat by adding more or less)
Cheese, any shredded variety, approximately 1/2 cup
Milk, 1/2 cup
Flour, 1 T
Panko bread crumbs, approximately 1/4 cup

Preheat oven to 375 degrees.

Rinse quinoa and cook in boiling water according to package directions (usually about 15 minutes). As it cooks it will become translucent in color and open up. While quinoa cooks, blanch peppers in boiling water for 5 minutes or so, until tender. Once cool, slice off the top and remove the inside flesh and seeds. If you want the peppers to lay on their side instead of sit upright, simply remove one side of the pepper. Then remove the top stem, flesh and seeds inside the pepper. 

Brown sausage in saute pan. Add kidney beans, minced adobe pepper and cooked quinoa to sausage once it is close to browned. Add combined mixture to inside of the peppers. 

In the same pan, without removing sausage drippings, add 1 tablespoon of flour. Stir in milk, scraping the bottom of the pan to remove sausage drippings. Make sure to stir continuously, so the flour doesn't clump. A typical thickening agent (a roux) consist of a fat, usually butter, and flour. For this recipe, I didn't add any additional butter or oil because there is already some fat in the pan from the sausage. Lastly, stir in 1/4 cup cheese until melted.

Pour the thickened cheese and milk mixture inside peppers, keeping in mind if you did the cutting method down the side (instead of the top), you won't be able to use as much liquid without some leaking. Sprinkle the top of the pepper with more cheese and bake for 5-7 minutes at 375 until cheese melted. 


Sprinkle panko bread crumbs over top and broil a few more minutes until brown and enjoy!

Better Bonus Tip: Think ahead to maximize your time and ingredients. Brown the entire 1 lb of sausage, even though you only need 1/2 lb for this recipe. It takes the same amount of time and energy to make 1/2 lb as it does the entire 1 lb. You could add the remaining sausage and some shredded cheese to scrambled eggs or an omelet the following day for breakfast or brunch. If you decided to cut the peppers as I did, by removing one side of the pepper (instead of removing only the top), you will have some left over that could be chopped up and added as well.

Happy (early) Food Day - Monday, October 24th!


~Ashley


Friday, October 14, 2011

Individual Chicken Pot Pies

Fall is here! I love Sunday evenings on the couch under a blanket, with a movie on the TV and a nice warm dinner in hand.  Last fall, I tried to make my first chicken pot pie and we loved it, so I wanted to share it with you. 


Zach always wants me to cook lima beans, he is a weird man right? I don’t mind lima beans, but they are definitely not a veggie I crave by any means. When I decided to try to make these chicken pot pies, I figured I would try adding them. My guess is some of you won’t want lima beans in your chicken pot pie. The great thing with this recipe is it can be individualized for you and your family, so have fun with this. A traditional pot pie usually contains onions, celery, carrots, and peas, so feel free to use those veggies or experiment with ones your family likes. 


I like to serve this meal in individual serving dishes, because it makes it more fun and elegant. You will have to play with the amount of each ingredient depending on how you decide to serve this and also depending on the amount of people you are feeding. Keep in mind the dish you choose will need to be oven safe.


Individual Chicken Pot Pies

Serves 4


Ingredients:
Puff pastry, thawed
Cooked chicken breast, shredded, one per person
Frozen pearl onions, 1 cup or so
Frozen corn, 1 cup or so
Frozen lima beans, 1 cup or so
Fresh mushrooms, 1 cup or so
Heavy cream, ½ cup heavy cream
Chicken stock, 3 cups
Flour, 4 tablespoons
Dried thyme, 1 tsp
Dried sage, 1 tsp
Garlic, 2 cloves minced
Fresh parsley, couple tablespoons chopped
Salt/Pepper, to taste
Butter, 1 T melted
Oil


Preheat oven to 400 degrees. 


Cook veggies in some oil, until warm and cooked through. 

 Add chicken, along with thyme, sage, garlic and some salt and pepper to taste.

Mix well and then add flour to coat meat and veggies. Stir in cream, mixing all of the ingredients together. Then pour in 3 cups of chicken stock and the fresh parsley. Bring to a boil and then reduce heat and simmer for 15-20 minutes, until thick, stirring occasionally.


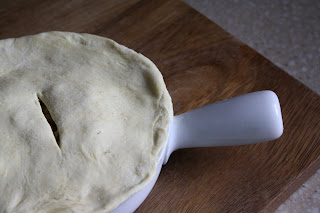
While veggies and chicken are simmering, unroll puff pastry sheets. Place individual serving bowls face down onto puff pastry. Use a knife and trace the edge of the bowl plus an extra centimeter or so, allowing for extra to fold over the edge of the bowl. 

Once the veggie and chicken mixture is thick, pour it into individual serving bowls and top with the puff pastry. Brush the top with melted butter so the pot pie will brown in the oven and cut a slit in the center.


Let pot pies brown in the oven for 15 minutes at 400 degrees.


Better Bonus Tip: To save some time, feel free to substitute a cooked rotisserie chicken. 


~Ashley

Friday, October 7, 2011

Cooking Staples - Onion and Garlic

Two staples in my kitchen are onion and garlic. At least one, if not both, go in almost every dish I make. 


Fresh is best! I strongly feel using fresh ingredients can completely transform the flavor in your food, however using fresh can be scary at first. Fresh garlic specifically intimidates people, but I want to encourage people to try it at least once. The flavor you get from fresh garlic, can’t compare to dried garlic power or garlic salt. 


A typical bulb (or head) of garlic has about 10-20 cloves, but how do you get to them? Cup your hand around the garlic bulb, and with the biggest part toward the bottom, smash the bulb onto a cutting board. This will loosen the bulb, opening it slightly, allowing you to remove individual cloves as needed to incorporate into your meals. If it doesn’t open up enough, just gently pull open the top of the bulb. 


The individual cloves will still have a ‘wrapper’ around it that needs to be removed. You can smash the clove on a cutting board, using the back of a knife and your palm to easily remove the 'wrapper.' Keep in mind the pressure you use to smash the clove, if it is important the clove stays whole.


Once out of it's 'wrapper', I also like to trim each of the edges of the clove before mincing. If you don’t like to use a knife for mincing garlic, there are tons of garlic presses out there, but I tend to think those just make a little more work because they can be hard to clean. 


Better Bonus Tip: Spice up your favorite sandwich or hamburger with a simple garlic aioli by adding minced garlic and a little lemon juice to your favorite mayonnaise.


___________________________________________________________________


When I first starting cooking a lot, I used to hate cutting onions. Now they are one of my favorite things to prep (I know I am a dork). The key is a good sharp knife and a good technique. My favorite type of knife for prepping veggies is a santoku, which are pretty easy to find in all different price ranges. I also have a knife sharpening steel that I try to use on my knife before each use to keep the blade from dulling quickly.

Better Bonus Tip: Bass Pro Shop's hunting department will sharpen your knives for free. To test if your knife needs sharpened, try cutting through a tomato - if you don’t get a nice clean cut easily, time to get professionally sharpened.


Here is the technique I use:

Prior to cutting the onion, you need to think about what you are doing with it and what size you want your pieces to be. If you are going for thin rounds of onion (for hamburgers or onion rings) cut down the middle towards one end, leaving the other root edge intact.  You will need to cut a tiny sliver in the outer layer to allow for peeling back the outer skin. To cut the onion rings, grab the knife with your dominant hand and make up and down movements along the onion, moving closer to the root edge with each slice.


If you are wanting onion slices (for fajitas) or chopped/minced onion,  you will need to cut the onion through the root edge leaving two pieces. 


Next, cut off one of the root edges on each half of the onion, leaving the other root edge intact. You should now have two individual pieces, both with a flat edge that can easily lay on the cutting board. At this point you should also be able to pull back the outer layer of the onion.


Now you need to decide to you want thin slices or small chopped pieces. 

To get thin slices, start on the edge opposite the root. Place your non-dominant set of fingers on the top of the onion, curling your finger tips under so your knuckles are predominately on top and closest to where the knife will be. Grab the knife with your dominant hand. Keep your tip of the knife on the edge of your cutting board and continue to make up and down movements along the onion, moving closer to the root edge with each slice.


To get perfectly uniform minced or chopped pieces, use your knife to slice multiple vertical slices along the onion making sure you don’t go all the way through the onion's root edge (this will keep the onion in one piece). You do, however want to go all the way from the top to the bottom. 


Next, use your knife to make horizontal slices into the onion, again making sure to not go all the way through the onion.  

 
Last step is making the small chopped pieces. Repeat the process above, moving the knife up and down, closer to the root edge with each slice, while trying to keep the tip of the knife on the edge of the cutting board. Once you are close to the root edge, you should have a pile of chopped onion, all with a pretty consistent size and shape. 


It might sound complicated, but I have confidence in you! Harder to explain step by step in a written format than it is to actually do :).

Better Bonus Tip: If you don’t like the texture of onion use a mini grater to add the juice to recipes, so you can at least get the fresh onion flavor.


~Ashley