Friday, June 29, 2012

Baba Ganoush

Back from California. We had a great time, but I am sad to say, I didn't get much inspiration for new recipes while there. I think my expectations were too high. I do however still try to get inspiration wherever we are, whatever I see on TV, read about, etc. My husband and I love to go to a restaurant named Yia Yia's Euro Bistro. The food is great, but the main reason we love to go is we crave the free starter they give you - baba ganoush. Baba ganoush, sometimes spelled baba ghanoush, is a Middle Eastern dip very similar to hummus. The main difference between the two is eggplant is used in baba ganoush, whereas garbanzo beans/chickpeas is the main ingredient in hummus. 

I love love love the dip and it seemed easy enough to make. I talked with the workers a few times, really listened to the way they described it when they brought it to the table and I was inspired to try to make it at home. Well I have tried twice and ….FAIL! It tastes nothing like their dip, which I guess is why they have a successful restaurant and I am just a home cook who attempts to cook and share recipes on a blog :)! Either way, still a good recipe worth sharing, so here you go. This is the final recipe in the Summer Starters and Sides Series, again taking help from the blender, so you can spend more time enjoying the weather and your family and friends!

Baba Ganoush
Inspired by Yia Yia's Euro Bistro Baba Ganoush


Ingredients:
Eggplant, 1
Greek plain yogurt, ¼ c
Lemon, 1
Garlic, 1


Preheat oven to 450 degrees. Prick edges of eggplant and roast for 20 minutes. When done in the oven, let cool so you will be able to handle it.

When cooled, slice open the eggplant and remove the skin. Chop the eggplant into a few pieces and place in the blender. Add remaining ingredients - ¼ c yogurt, juice of one lemon and one clove of garlic. 


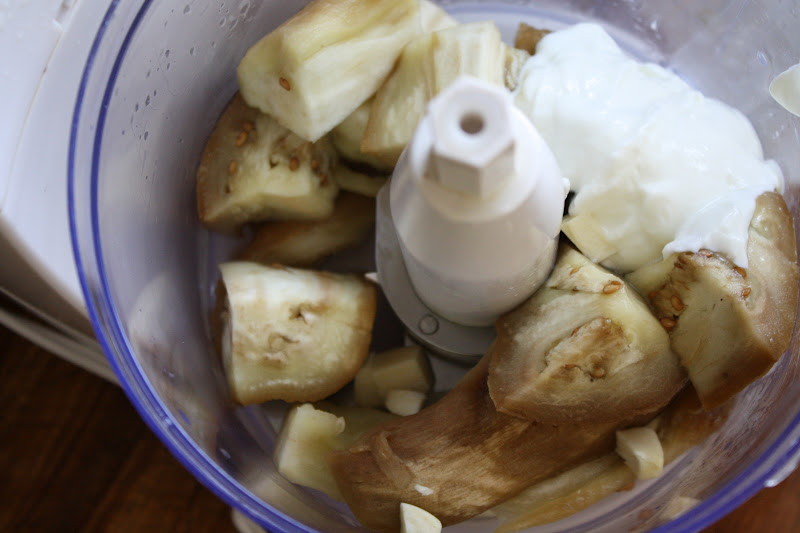
Better Bonus Tip: Remove the seeds from the eggplant if you would like. I don’t mind them but some might.

Blend until smooth but still thick. At this point the dip is still probably slightly warm from the eggplant, so I would recommend cooling in the refrigerator until ready to serve.

Hummus, as you may know doesn't really have a bold flavor. Well baba ganoush is the same way. To serve this dip, I think adding some toppings helps with extra flavor.

Suggested toppings:

  • Herb oil (blend ¼ c extra virgin oil, 1 T of chive and 1 T of parsley)
  • Smoked paprika
  • Sesame seeds
  • Lemon juice
  • Sesame oil, few drops (little goes a long way)

Traditionally this dip is served with pita (again like hummus), but my friends and I have found we like a firmer bread because of the contrast in texture.  If you would like to go that route, just throw some slices of bread on your grill or grill pan with a drizzle of olive oil or try my crispy garlic baguettes from
earlier this month.


Just yesterday I got to have some of this delicious dip at work. My coworker brought some in for us because we share the love. I am not giving up! Next time I try to make this, I think I will try adding a little more yogurt. That is the only thing I can think of, it is just so creamy and delicious. I will keep you posted!


~Ashley


Friday, June 22, 2012

Fried 'Rice'

This week I am posting from sunny California! We are out visiting some friends and I am hoping for some inspiration for new recipes. Before we left town I made my dish for this week’s blog - my take on fried rice.


Since this month we are focusing on Summer Starters and Sides, I decided to use couscous instead of rice. Couscous is great year round, but we really love it in the summer because it is so light. Also, it is quick cooking, so fits in nicely with the theme of not wanting to spend a lot of time in the kitchen when it is so nice out.

Every time I make couscous, my husband says ‘The food so nice they named it twice’. Corny, but makes me laugh. I think he heard it on some comedy movie.  Couscous is a pasta and comes in two varieties - regular and Israeli, also known as pearl. Regular is smaller by nature (the one on the left) and takes even less time to cook than the already quick cooking Israeli variety (the one on the right). For this dish, I chose to use the Israeli variety because it is a little heartier and I thought it would hold up nicely in this dish.


Fried ‘Rice’

Servings 4-6


Ingredients:
Pearl couscous, 1 cup uncooked
Beef broth, 1 ¼ c
Egg, 2
Carrot, 2
Garlic, 1 clove minced
Frozen peas, 1 cup
Ham, 6 deli slices
Green onion, 3 large
Soy sauce, 3 T
Cilantro, 2-3 T
Lime, 1


Bring broth to a boil, add couscous. Cover pot, reduce heat to a simmer and cook for 8 minutes, stiring occasionally. When done cooking, the liquid should be absorbed.


Better Bonus Tip: Use broth or half broth, half water when cooking any grain to infuse extra flavor during the cooking process.

While couscous is cooking, prepare the rest of the ingredients. Using the largest slots on a box grater, shred two carrots. I don’t like to get to close to the end of the carrot with the grater, so I end up grating two carrots, ¾ of the way down. Also, chop both the white and green parts of three large green onions. 


Next, layer all of the ham slices on top of each other. Using a knife, make strips and then slice the other directions so you end up with equal size square pieces of ham.


Crack two eggs into a bowl and whisk with a fork. Heat a pan to medium heat and spray with cooking spray. Add eggs and cook for 30 seconds - 1 minute, breaking up into pieces as the egg scrambles. Remove egg and set aside.


Next, add a couple tablespoons of oil to the pan and add carrots, green onion, frozen peas and ham. Cook for 3-4 minutes. Add minced garlic to pan and cook for additional 30 seconds. 


Increase heat to medium high, add cooked couscous, egg and 3 T soy sauce. Cook for additional 2 minutes until flavors well combined.


Top with couple tablespoons of chopped cilantro and juice of one lime.


Better Bonus Tip: This is great as a side dish with your favorite teriyaki marinated protein, but would also be great by its self as a light summer meal.  


See you next week!


~Ashley


Friday, June 15, 2012

Olive Tapenade

I mentioned last week that I love just about anything with a pickled flavor. Well today I am making a dip that is about as pickled as you can get - an Olive Tapenade. If you love that flavor like I do, this dish is for you!


Since it is summer, I think most of us aren’t wanting to spend a lot of time in the kitchen, so this month I am sharing two starters that are fast and easy to make because the blender does all the work for you. Another bonus - this dip is great with the hot summer heat because it doesn't have any ingredients that will spoil. 

Olive Tapenade


Ingredients:
Pitted olives, 1 c (I used greek mix)
Capers ⅛ c
Lemon, ½
Garlic, 1 clove
Parsley, leaves of 2-3 sprigs
Pickling liquid from olives, 2 T
Extra virgin olive oil, 1 T


Place all ingredients in the blender and pulse until mixed. You still want some consistency in this dip, so don’t over blend.


Serve with your favorite bread or cracker.


Better Bonus Tip: Try serving with my crispy garlic baguette. Slice a small baguette. Drizzle with olive oil and bake at 375 degrees for 8-10 minutes, until slightly golden brown. When you remove from the oven, rub a fresh garlic clove over each piece of bread while it is still warm.


Easy huh?


~Ashley


Friday, June 8, 2012

Greek Orzo Pasta Salad

Today is the first recipe in my second series - Summer Sides and Starters. For the rest of this month, I will be sharing recipes that are great on a hot summer today. They are light dishes, easy to make, but still full of flavor. First up - my take on a greek pasta salad.


Most greek pasta salads have similar ingredients: red onion, tomato, olives, feta to name a few, but of course I want to make mine a little unique.  I am using orzo as the grain instead of traditional pasta, using capers instead of kalamata olives and infusing lemon flavor three different ways in this dish.

Orzo, Italian for barley,  is a pasta by nature, but looks like a rice. It is a substantial grain and will hold up against anything. You can eat it hot or cold, as the star of the dish or as an accent - try in your favorite soup. I even found 100% whole grain at the store this week, so was excited about that. My tip for using orzo (and any grain) is make sure you have enough water in your pot. The first couple of times I didn’t and the orzo got sticky and it wasn’t a pretty site!


So I love anything pickled and salty - well almost anything, no pigs feet for me. Capers are a relative of the caper berry, both of which grow on the plant Capparis spinosa, known as the caper bush. Caper berries are larger in size and come with a stem, while the caper is a small bite size version. I think they are both delicious, but the mini caper is probably more widely known and available, in addition to being utilized in cooking more often than the berry. You can find me at the pickle bar at Whole Foods stocking up on caper berries just to munch on by themselves.  The flavor is extremely hard to describe, but I would say even if you don’t like the flavor of them alone, don’t write them off yet - they can compliment a dish very nicely. If you don’t typically like salty pickled flavor, just drain and rinse under cold water before adding.


So we talked about infused oils last week and today I am making a lemon garlic infused oil to use as the dressing for this salad. I also add some lemon peel to the pot of orzo to infuse extra flavor during the cooking process and finally some fresh lemon juice to add a final splash of freshness. No bottled lemon juice for this recipe!

Greek Orzo Pasta Salad
Serves 4-6


Ingredients:
Orzo, 8 oz (most packages are 16 oz - whole wheat is best)
Lemon, 1
Garlic, 1 clove
Oil: olive oil or extra virgin, ¼ c
Red onion, ½ large onion (chopped equals approximately ¾ c)
Cherry tomatoes, ½ pint (chopped equals approximately 1 c)
Capers, drained, ¼ c
Basil, ½ c chopped
Feta cheese, ¾ c


Better Bonus Tip: Try adding cucumber. I don’t care for it, but that is very traditional ingredient in Greek salads.

Start by making an infused oil. Using your vegetable peeler, remove the outer layer of the lemon into strips. Add four pieces of lemon peel and one clove of garlic to ¼ c oil over medium heat. Set aside the remaining lemon peel strips. Once the oil is at a simmer, reduce heat to medium low and continue simmering for 5 more minutes. Keep an eye on it. The garlic and lemon peels will brown slightly, but don’t let them burn. Once done infusing, set aside to cool.


Better Bonus Tip: It will take the same amount of time no matter the amount of oil. Make extra and use as a starter to a great salad dressing later in the week. 

Make orzo according to package directions. Add four more lemon peels to the water. Make sure to continue to stir, so the pasta doesn't stick together. Drain and let cool slightly once done cooking.

Better Bonus Tip: Always remember to salt your boiling water if you are cooking pasta. Adding citrus peel to the water is a great way to add extra flavor to any grain - try with other pastas or rice.

Chop red onion and cherry tomatoes into bite size pieces. Chiffonade basil into ribbons until you have ½ c. If you forgot how to do that, check out how here.


Mix cooked pasta, red onion, cherry tomatoes, capers, basil, juice of one lemon together. Stir and then add ¼ c lemon garlic infused oil. Last, add ¾ c feta cheese.

Serve this pasta salad at room temperature, warm or cold - you decide. 

Better Bonus Tip: This salad is great at room temperature on a hot summer day. You can still make ahead of time for your cookout or gathering, just remove from the refrigerator, stir and let it come to room temperature before serving.


I hope you will enjoy my version of a Greek Pasta Salad!

~Ashley


Friday, June 1, 2012

DIY Infused Cooking Oils

As I was thinking about what I wanted to make for the blog this month, I thought it would be fun to utilize some infused oils in recipes. I have made an infused oil in the past and it went okay, but not great. This time around I spent a lot of time reading and trying to learn instead of just winging it.


Infused oils are great in dressings, mixed with grains, drizzled on grilled veggies or as a simple dip for some crusty bread.


There are two different methods for making infused oils - heat infused and cold infused. Today I will share with you the details of each process.


To start off you need to establish a few things:
  • What type of infused oil do you want to make?  
Some ideas for infuser ingredients are citrus, garlic, chilis or herbs. For an herb infused oil,  some suggestions would be basil, rosemary, oregano, chives, cilantro, parsley, or mint.  For a citrus infused oil, only use the zest, no juice. Simply use a vegetable peeler and remove the zest in strips, trying not to get the white bitter pith.
  • What type of oil do you want to use?
I think it is best to use an olive oil or extra virgin olive oil as the base.
  • Which method do you want to try?
Cold vs. heat infused - benefits of both. Detailed described below.
  • What type of container do you want to use?
You may not need a jar, depending on the method you choose below, but if you do, I  personally like mason jars or oil dispensers. The key is make sure it is sterilized. To do this, just place in a large pot of near boiling water for 10 minutes.


Cold Infused
With this method, both the oil and the infuser ingredient(s) remain cold. No heat is every instilled. To make a cold infused oil, there are a couple of options. One option, the quickest and easiest, is to mix the infuser ingredient with oil in a blender. Another option is to add the infuser ingredient to the container of your choice and let it sit in a cool dry place for a couple of weeks to maximize the flavor. If you choose the second option and are making an herb infused oil, it is important the herbs are dry to avoid bacteria growth. Also, you will get best results if you bruise the fresh herb to release the essential oils. The most important take home point with this method is DO NOT EVER MAKE A GARLIC INFUSED OIL USING THE COLD METHOD. IF YOU USE RAW GARLIC THAT HAS NOT BEEN HEAT ‘TREATED’ YOU ARE AT RISK FOR BOTULISM. Clostridium botulism is bacteria that is found in soil and potentially anything grown in soil. This bacteria dies in the presence of oxygen, but when making an infused oil, oxygen is not present making this a prime place for this bacteria to live.

Heat Infused
With this method, you guessed it, heat is used to increase the flavor of the infused oil.  With a heat infused oil, the flavor is intensified quickly - no need to let it sit and ‘marinate’. Again you have a couple of options. First up is warm both the oil and the infuser ingredient(s) over medium low heat for 5-10 minutes. Some browning will occur, but make sure your infuser ingredient does not burn. The second option is to only warm the oil and pour over your infuser ingredient that has remained room temperature. With this second option, you will probably want it to sit for a few hours - days, but not near as long as you would need to with a cold infused oil. AGAIN, MAKE SURE YOUR GARLIC IS HEATED - EITHER BY ROASTING IN THE OVEN OR SAUTEING ON THE STOVE TOP- PRIOR TO ADDING TO THE OIL TO KILL THE BACTERIA.

My Opinion (if you care)
There is not clear recommendations for the amount of time an infused oil should steep to get enough flavor or the shelf life of an infused oil. With that said, I tend to prefer to take the safe route and only make the infused oil for what I need at the current time, or at least what I know I can use up in a few days.


For an herb infused oil, I prefer the cold blender method. For a garlic or lemon infused oil, I prefer the heat infused method, warming them both on the stop top. 


This month I will be doing my second series - Summer Starters and Sides. A couple of the recipes will be utilizing infused oils, so stay tuned. If you want to practice while you wait for a recipe, try a lemon garlic infused oil using the heat method. Serve on a shallow plate with a drizzle of balsamic vinegar, a sprinkle of salt and freshly ground pepper with some crusty bread!

Have a great weekend - see you next Friday!


~Ashley