Friday, June 28, 2013

Lemon Garlic Hummus

At my work, we celebrate birthdays on a monthly basis and everyone brings in food. This week was June’s celebration and I decided to try making hummus from scratch. I have been wanting to do it for a while, but tahini, which is a common ingredient in hummus, scared me. Tahini is basically a ground sesame paste. The first time I went to the store to buy it to make hummus I about fell over. It was so expensive and you had to buy a huge container. Most hummus recipes call for only a few tablespoons and I didn’t know of anything else to use tahini in, so didn’t really like this! Basically I left and decided nevermind. Well a few months back, I read a tip about making your own tahini by grounding up sesame seeds. You absolutely need a great food processor for this because the seeds are so tiny, but I decided to give it a try. Turned out pretty good. I hope you will consider trying it as well because anytime you make something from scratch you are able to control the ingredients and I know I personally feel better about that!


Lemon Garlic Hummus
Makes 1.5 cups


Ingredients:
Chickpeas (garbanzo beans), 1 can drained or 2 cups fresh cooked beans
Garlic, 3 cloves
Lemon, 1.5 - 2 depending on how ripe they are
Tahini, 2 T (see below for homemade)
Extra virgin olive oil, 4T
Salt, 1 tsp


Simple as putting all in the food processor and blending until smooth.


Better Bonus Tip: Very easy to double, which is what I did to take the recipe to work.


To serve, sprinkle with paprika for color and a few additional squeezes of fresh lemon juice for fresh flavor. I personally think hummus can be bland by nature, but it is such a great protein packed snack. The extra squeeze of fresh lemon juice definitely helps! My favorite way to eat it is with pretzels because of the added salty crunch.


Better Bonus Tip: Try adding roasted red peppers, fresh herbs, artichokes, sun dried tomatoes, other citrus, or other dried seasonings for a different flavor.


This is a thicker hummus recipe and to be honest after I took pictures and my husband and I had a little bit, we decided to thin it out some to make it more like store bought conventional hummus. Add up to 4 T water in the blender, until you reach your desired consistency level.


Enjoy!


Homemade Tahini


Ingredients:
Sesame seeds
Sesame oil


I bought a 3 ¾ oz container of sesame seeds, which equaled ¾ c seeds. Add seeds to your food processor and blend, adding a tsp at a time of sesame oil. I believe I ended up doing 4 tsp sesame oil, but of course forgot to write it down!! Stop every so often to scrap the sides of the processor. Mine didn’t turn into a complete paste, but blended up enough to not have seeds floating around in my hummus.


This makes quite a bit more tahini than you need for the above hummus recipe, but you need enough sesame seeds to be able to successfully blend. Store the extra in the fridge. I think you will realize how easy hummus is to make, you might not ever buy store bought again. The hardest part is probably making the tahini and if you store the extra in the fridge, you will have extra available to make a quick batch to use on sandwiches or wraps - a light summer dinner!

~Ashley


Friday, June 21, 2013

Meatball Sub Sandwich

This week’s post is for my husband. I have said a few times on this blog that my husband loves sandwiches. Me on the other hand, never my first choice of a meal. As you have probably gathered though, I do like to cook stuff and have a freezer stocked of foods to help with quick meals. Today I making a bunch of meatballs. I made my husband a meatball sub sandwich and then I have lots of extra meatballs that I can store in the freezer for a meal down the line. I would prefer to just eat the meatballs by themselves with a side of roasted asparagus and roasted potatoes. Or have some for a quick pasta dish. One main dish - both of us happy!


My secret ingredient anytime I cook ground meat is shredded veggies. I know that might sound gross, but zucchini in particular is really easy to sneak into ground meat. I feel zucchini is light in color and mild in flavor and your guests / family probably won’t even know. I also use carrots occasionally, but the orange color is obviously a bit more of a give away. Feel free to leave the zucchini out or give it a try and see if anyone notices. Finally, we like onion in our house, but some people don’t. If you don’t like onion texture, use a microplane or fine grater to at least add onion juice to the meat mixture. Or feel free to leave out fresh onion completely and maybe try some onion powder instead.


Meatball Sub
Makes 22-24 meatballs


Ingredients:
Ground meat (I used beef because we always have it in the freezer), 1 lb
Onion, 1 small chopped (about ⅔ c)
Garlic, 2 cloves
Dried oregano, ½ tsp
Dried basil, 1 tsp
Dried parsley, 1 tsp
Grated parmesan cheese, ¼ c
Egg, 1
Zucchini, 1
Salt and pepper, to taste


Additional ingredients for sub sandwich:
Whole wheat hoagie roll(s)
Pasta sauce
Mozzarella cheese


Preheat the oven to 400 degrees.


Shred zucchini using a box grater.

Better Bonus Tip: If you want to be even sneakier, remove the green skin so the meatballs don't have the added color.


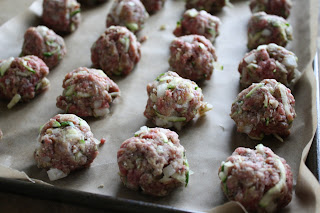
Mix all meatball ingredients together.


Form into 1 inch balls and add to a pan with sides (to catch potential grease that releases during cooking). Cook for 20 minutes. After meatballs are done cooking. Set aside to slightly cool.


Slice rolls in half, although I don’t like to go all the way through the bread - making a sleeve almost.


Layer some pasta sauce on the bottom of the roll. Add three meatballs to each roll and then top with more sauce. Finally, sprinkle with some shredded mozzarella or you can use a slice if you have that on hand.


Bake the sandwiches at 400 degrees for 5-7 minutes until cheese is melted and everything is toasty. If you are using meatballs from the freezer, I like to defrost a bit before putting on the bread, to avoid excess moisture. Might also need to heat a bit longer to heat throughout, depending on that status of your freezer meatballs.


Better Bonus Tip: For a different meatball variety, try my mini meatloaf recipe and make into meatballs instead of loaves. You could even add some of the sauce on top of each meatball - yummy!

~Ashley


Friday, June 14, 2013

Two Ingredient Dessert

C.H.O.C.O.L.A.T.E!! Who doesn’t love chocolate? Anyone? Anyone? Probably not. I know people may gravitate to salty treats or fruity sweets, but really who can turn away chocolate? Ironically, I tend to like fruity sweets - maybe because I don’t feel as guilty since it seems lighter, but honestly I still love nuts and chocolate together! I talked last week about trying to make my own sweets when I can. This allows me to control the ingredients and feel better about the decisions I am making and that decision is always NOT to have strict restriction. Today, we are making a super easy two ingredient chocolate and nut cluster. Can you guess the two ingredients? Oh wait I just told you - nuts and chocolate. Yep, its that easy!! Lets get started.


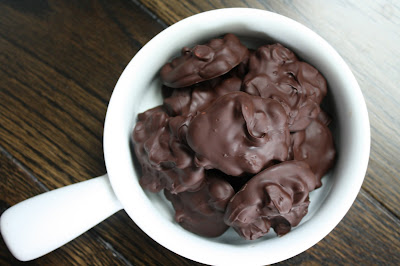
Chocolate and Nut Clusters
Makes 12-15 pieces


Ingredients:
Chocolate chips (I use a cacao blend chip), 1 ½ c
Nuts, any variety (I used half pistachios and half peanuts), ½ c


If you buy raw nuts, roast the nuts in a dry saute pan. Shake occasionally and make sure not to burn. You will start to smell them when they are done. Set aside and let cool.


Use a double boiler or pyrex tempered glass bowl over a pot of boiling water. I just used a bowl. It is important to make sure the bowl doesn’t touch the boiling water. Add the chocolate and stir over medium high heat until completely melted.


Once chocolate is completely melted, add the nuts and stir to combine. Turn down the heat, but keep the pan on some heat so the chocolate doesn’t cool and start to harden.


Using a mini ice cream scoop or spoon and add the chocolate nut mixture to a baking sheet covered with wax paper. Don’t worry they don’t have to be consistently shaped or pretty. I guarantee people will still eat them :). I flatten out the mixture a bit, but do as you please.


Add the clusters to the fridge for at least 20 minutes to harden and then of course you must try one! I store the rest in the fridge to keep them formed and hard.


Better Bonus Tip: This can be easily doubled or tripled. Try adding different extracts for added depth of flavor - vanilla, almond, raspberry, orange and coconut all sound good to me. Try different nuts or dried fruit. Feel free to not stir in mix ins, instead add chocolate to wax paper and sprinkling the nuts / dried fruit to the top of the chocolate.


Having fun and being creative is always my goal for you, so do as you please!! See you next week.

~Ashley


Friday, June 7, 2013

Better Choices: Sweeteners and Chocolate!

Okay, back again with another Better Choices post. Today we are talking sweeteners and chocolate! To remind you this is why I am doing this. So far, we have talked grains, dairy, dyes, and GMOs.


As a reminder, I have a few standards I try to stick to:

  • Eat real foods as often as possible
  • Focus on unprocessed or less processed foods
  • Not falling for low fat, low calories, healthy food claims, etc
  • No strict restriction
  • Doing what I can, as often as I can
  • Enjoying life while trying to make better choices!


You will NEVER be perfect and if you are even close to it, you probably don’t get to enjoy a social life or time with family and friends. Let yourself indulge occasionally and not feel guilty or you will fail. That brings me to today’s entry. I do eat sweets. I would live a sad life if I didn’t.


I do try to make sweets at my house if I want something and always try to buy the best ingredients, so I feel better about it. There are some things however I can’t make. Being pregnant I was finding I wanted ice cream or frozen yogurt a lot. Well, I don’t have an ice cream maker (although would love one!), so I tried to make the best choices with a store bought variety and I found some with only 6 ingredients. I can now keep some in the freezer so I can have a couple of spoonfuls after dinner instead of sending my husband out to buy me something huge and full of junk. I am doing what I can right now....


Today, I hope to teach you some changes you can make in your home so you can do what you can too. Again, remember this is a journey so I don’t expect you to have changed everything in your house based on what we started talking about at the beginning of the year. Figure out what is the most important topic to you to focus on and make a plan for continuing to make small changes.  


Sweeteners and chocolate are more recent changes I have made in our kitchen. I hadn’t spent as much time learning about these topics as I had others, because frankly I found it overwhelming. We can all feel overwhelmed at some point right?!


What I do know is the bottom line is sugar is sugar, no matter what form! That means we need to keep in mind not abusing it and it is a substance we should consider moderating. There are serious health concerns associated with excessive sugar consumption.


The American Heart Association recommends that women consume no more than 6 teaspoons of added sugars a day and 9 teaspoons for men. Sadly, most consume significantly more than that.


Here are a couple of other startling infographics you can check out with great information:


Sugar is found naturally in many foods, for example dairy, fruit, veggies and even some grains. Being in healthcare and having some understanding of science there are some things to consider regarding all the different ‘ose’ ingredients (glucose, fructose, etc) as far as glycemic index, insulin and such.  I won’t get that deep today. My goal is always to give you the 101!  You can’t and shouldn’t avoid naturally occurring sugars. You should however focus on the added sugars. Added sugars are found in many drinks and processed foods.


It is important to note the sugar content on the nutritional label contains both natural and added sugars. To know if the sugar in the product is natural or added, you must read the ingredient label (are you seeing the trend in these posts?). The added sugars are listed on the ingredient list and are disguised as many things. Its kind of crazy actually!

  • agave nectar
  • barley malt
  • beet sugar
  • brown rice syrup
  • brown sugar
  • cane crystals
  • cane sugar (pure cane sugar)
  • carmel
  • coconut sugar
  • corn sweetener
  • corn syrup
  • crystalline fructose
  • date sugar
  • dextrose
  • evaporated cane juice
  • fructose
  • fruit juice concentrates
  • galactose
  • glucose
  • granulated sugar
  • high fructose corn syrup
  • honey
  • invert sugar
  • lactose
  • maltose
  • malt syrup
  • maple syrup
  • molasses
  • muscovado
  • palm sugar
  • raw sugar
  • rice bran syrup
  • sucanat
  • sucrose
  • sugar
  • syrup
  • table sugar
  • turbinado

**I am pretty sure this is still not conclusive**


Keep in mind ingredients are listed by quantity, so if any of the above are listed towards the beginning that means there is a lot of sugar in that food. Companies even get tricky and use multiple different types of sugar in a product, so they can separate them on the ingredient list and list them further down making it look like there is less. When tracking your added sugar intake, keep in mind 4 grams of sugar equals 1 tsp.

So what about sugar substitutes?  I know some people can’t avoid sugar substitutes for medical reasons (ie Diabetes). I use to be an avid user of splenda. Since I have learned and changed my philosophy to focusing on REAL foods, those made in labs, including sugar substitutes are no longer something I want to partake in. I also find it concerning that some substitutes are released to the market and then years later end up with some pretty scary health claims. For example, aspartame and high fructose corn syrup (HFCS) are two that come to mind. What is next?

Some sweeteners such as agave and stevia have claims of being natural. From what I have learned that is true to an extent, but most of what is sold in typical stores is processed. Some even compare agave to HFCS, which is a bit scary. While they may be more natural, as compared to some artificial sweeteners (saccharin, aspartame and sucralose), they are still highly processed.  A lot of sweeteners are also processed with maltodextrin, which if you remember from a few weeks ago is a corn derivative and likely a GMO.

So what do I use? I prefer to just stick to those things natural and that have been around for many, many years! I use raw honey and maple syrup the most. It is important to note, some honey is processed and stripped of nutrients, so make sure to look for the raw kind. Depending on the manufacture, it can look different (a lighter color) than other honeys. I promise it tastes the same!  For the maple syrup, make sure to look for 100% maple syrup, not those pancake syrup jugs! These will both be a bit more expensive, but should last a while if you aren’t using sugar all the time. I do occasionally use organic white cane sugar when baking and even less often, but occasionally organic brown sugar when I have a recipe that I want a great crumbly toppings. I am also beginning to learn about turbinado, muscovado and sucanat as a more unprocessed sugar crystal. So far what I have read is it is a bit misleading when they say it is ‘raw’, but can be a less processed than other varieties. Also, it is not a super fine crystal so might work better if substituting for brown sugar - not so much white sugar. Verdict is still out for me.

Additional Better Bonus Tips:
  • I have to say it, but drink less / no pop!
  • If you want juice, mix some water with it. This is important for kids also. Or better yet, get a juicer and make your own. (This is also on my to do list for the future)
  • If you like tea, get unsweetened and add your own sweetener (ie honey).
  • Make your own baked goods.
  • Read packaged food labels, include condiments, cereals, etc.
  • Make your own condiments, including salad dressings.
  • Try weaning yourself by cutting your added sugar down by half (for example to your coffee in the morning - check out my homemade creamer below). You might be surprised you are okay with less sugar!
  • Play around with different extracts instead of sugars.
  • Try applesauce instead of sugars when baking.

So now, onto chocolate. Just a few things to say here. I have had some questions about cacao which I have recently posted as an ingredient I use instead of conventional chocolate.  Cacao is basically a unprocessed / raw variety of chocolate. Cacao comes in a powder and nibs, which are basically just little pieces, and tends to mimic dark chocolate - meaning it is a bit more bitter. You can get chips, similar to traditional chocolate chips, which I have only found in a mixture, a percentage of cacao and the rest conventional chocolate.  When a percentage of cacao is used with conventional chocolate they are basically trying to obtain a sweeter chocolate flavor, more similar to milk chocolate. Whole Foods has some in their bulk bins which also cuts down on cost. Keep in mind if you are wanting true cacao, you need to read the label and that should be the only thing listed - 100% cacao. Also, don’t be confused by another chocolate you might see at the health food store, carob. While cacao and cocoa come from the same bean, carob is a different bean.  I don’t know much about it and have not used it myself, but from what I have learned it is not necessarily known for its unprocessed characteristics, instead is simply just a different variety often with a roasted flavor.

A plug for a better processed chocolate: UNREAL. I posted on this on the Cooking For A Better Tomorrow Facebook Page last fall around Halloween. This is a company that was started up by a young boy who was convinced he could enjoy chocolate bars and candies without a bunch of junk in them. Their products contain no corn syrup, partially hydrogenated oils, GMOs, artificial colors, flavors, or preservatives. The sugar content is reduced by over 40% per serving on average. Key ingredients are responsibly sourced, supporting farming communities and preventing destruction of the rain forests and when dairy is used it comes from pasture raised cows with no antibiotics or added hormones. They compare their products to Snickers, Reese's, M&Ms, Peanut M&Ms and Milky Way. Additionally, the price is not outrageous (about $1 or less). I can find them at CVS and Target and can buy them in a bag of mini bars or the regular size.


Okay, so one more idea to share with you. Yes, I know it is summer but some yummy hot chocolate around the campfire on a chilly evening sounds pretty good still. The weather hasn’t gotten too hot around here yet.  If you think I am crazy, save this for winter! Here is my easy ‘recipe’. You might have seen me post it on the Cooking For A Better Tomorrow Facebook Page last winter on a snow day. Glad those days are behind us!

Hot Chocolate


Ingredients:
Milk, 1 - 1 1/4 c milk
Chocolate powder (I use cacao powder), 1 T
Maple syrup, 1 tsp

Warm milk in the microwave for 1 minute. Add chocolate powder and maple syrup. Warm another 45 seconds.

Much better than what you find listed on the back of prepackaged hot chocolate packets!


Here are some additional recipes I have shared in the past using sweeteners and / or chocolate:

I’ll be back next week with a simple sweet chocolate treat!

Also, if you are looking for additional resources, let me know, I have many websites saved.

Don’t forget, "the bottom line is that while none of us can do everything, all of us can do something."
-Robyn O’Brien


~Ashley